Complete Guide to Garment Tailoring: Measurements, Pattern Making, Cutting & Sewing (With Images)
A comprehensive step-by-step guide to tailoring clothes: accurate body measurements, fabric selection, essential tools, drafting basic patterns, cutting and sewing, fitting adjustments, and professional finishing.
Complete Guide to Garment Tailoring: Measurements, Pattern Making, Cutting & Sewing (With Images)
TL;DR: Take precise body measurements, choose suitable fabrics, draft a basic pattern with ease and seam allowances, cut the fabric on the correct grainline, sew in logical order (shoulders → sides → sleeves → finishing), test-fit, adjust, and complete with pressing and closures (zipper/buttons).
Safety & Essentials
- Use fabric scissors only for fabric (never for paper). Keep needles and tools away from children.
- Always test iron temperature on a scrap piece first. Work in a well-ventilated area when using fusible interfacing.
- Maintain good posture, bright lighting, and secure fabrics with clips or pins instead of stretching by hand.
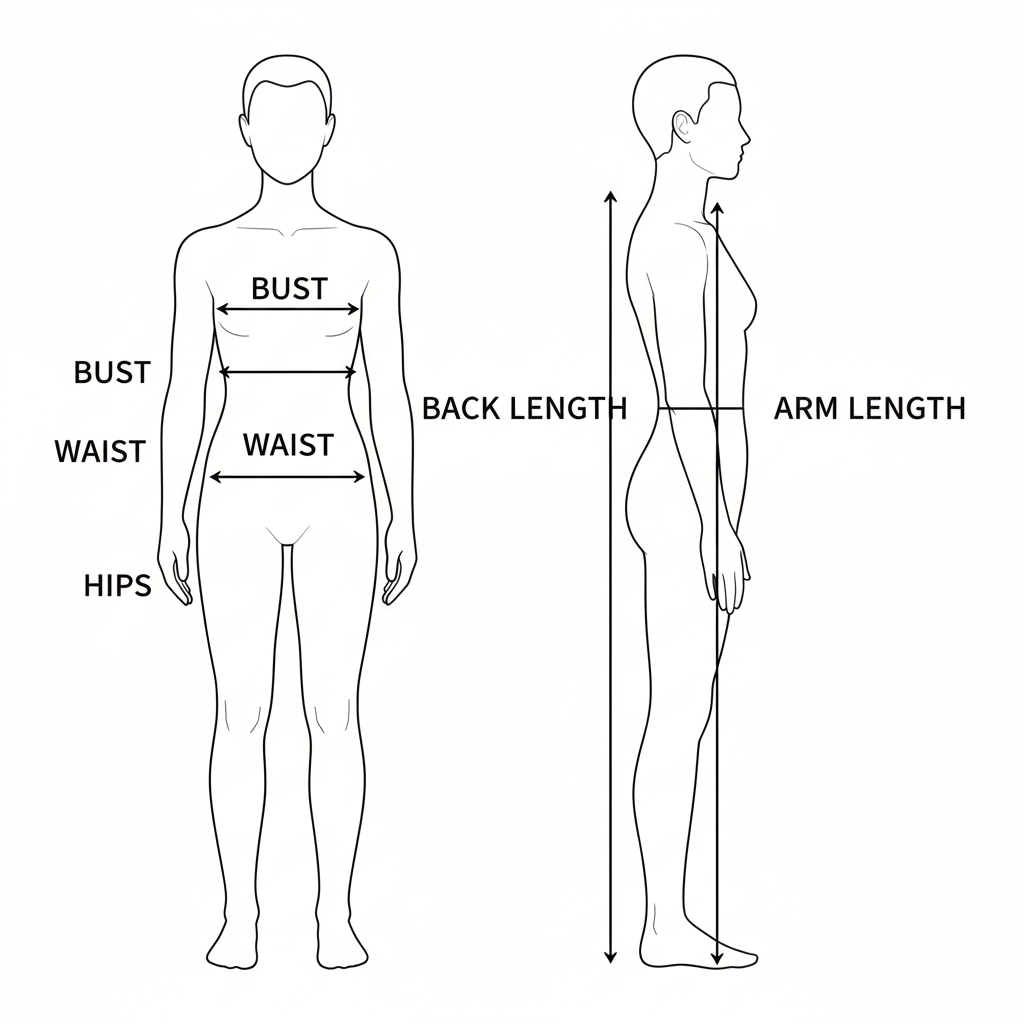
1) Taking Accurate Measurements
Wear light clothing, use a soft measuring tape, and record all values carefully. Measure Bust, Waist, Hips, Back Length, Arm Length, Hip Height, and desired garment length.
Sample Measurement Chart
| Measurement | Description | Note |
|---|---|---|
| Bust | Fullest part of chest | Add 4–8 cm ease depending on fit |
| Waist | Natural waistline | Ease 2–4 cm |
| Hips | Fullest hip area | Ease 4–6 cm |
| Back Length | From base of neck to waist | Ensures waist placement |
| Arm Length | From shoulder to wrist | Add 2 cm for hem allowance |
2) Choosing Fabrics & Linings
- Cotton/Linen: Great for beginners, breathable, easy to press.
- Polyester/Blends: Wrinkle-resistant, lower ironing temperature.
- Jersey/Stretch: Requires ballpoint needle and stretch stitch.
- Wool: Warm, ideal for structured garments, needs lining and steam pressing.
- Interfacing & Lining: Add body and structure to collars, cuffs, and waistbands.

3) Essential Tools
- Sewing machine with proper needles (70/10 light, 80/12 medium, 90/14 heavy, ballpoint for stretch).
- Fabric shears, paper scissors, seam ripper.
- Measuring tape, straight and curved rulers (French curve), tailor’s chalk or marking pen.
- Pins or clips, iron, ironing board, fusible interfacing, buttons or zippers.
- Optional overlock (serger) or zigzag stitch for seam finishing.
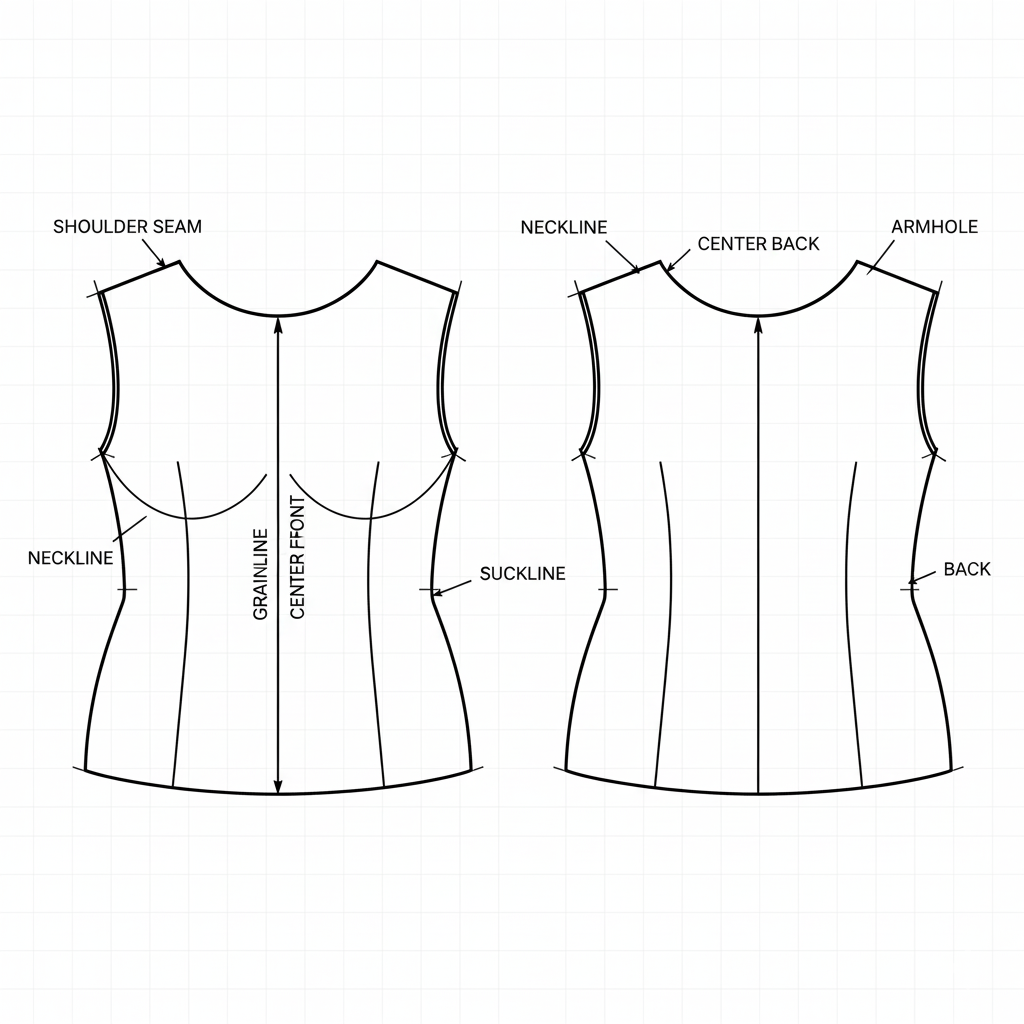
4) Drafting the Basic Pattern Block
Draft a basic bodice or trouser block using body measurements plus the necessary ease. Mark the grainline, center line, darts, and seam allowances clearly.
Seam Allowances & Ease
| Part | Allowance | Notes |
|---|---|---|
| Sides/Shoulders | 1–1.5 cm | Allow for adjustments |
| Hems | 2–4 cm | Depending on design |
| Zipper opening | 2–3 cm | For invisible zipper |
| Collars/Cuffs | 1 cm | Use fusible interfacing |
5) Cutting Layout & Grainline
Lay pattern pieces on fabric following the grainline parallel to the selvedge. Pin or clip pieces securely and cut smoothly with fabric shears.

6) Basic Stitches & Techniques
- Straight stitch: For main seams; 2.5–3 mm stitch length for medium fabrics.
- Zigzag stitch: Edge finishing or stretch fabrics.
- Overlock/Serger: Professional edge finishing.
- French seam: Enclosed seam for delicate fabrics.
- Topstitch: Decorative and reinforcing stitch near edges.
Needle & Thread Reference
| Fabric Type | Needle | Thread | Notes |
|---|---|---|---|
| Light cotton/linen | 70/10 | Polyester or cotton | Stitch length 2–2.5 |
| Medium weight | 80/12 | Polyester | Stitch 2.5–3 |
| Heavy (denim/canvas) | 90/14 | Strong polyester | May require Teflon foot |
| Jersey/stretch | Ballpoint | Polyester | Use stretch or zigzag stitch |
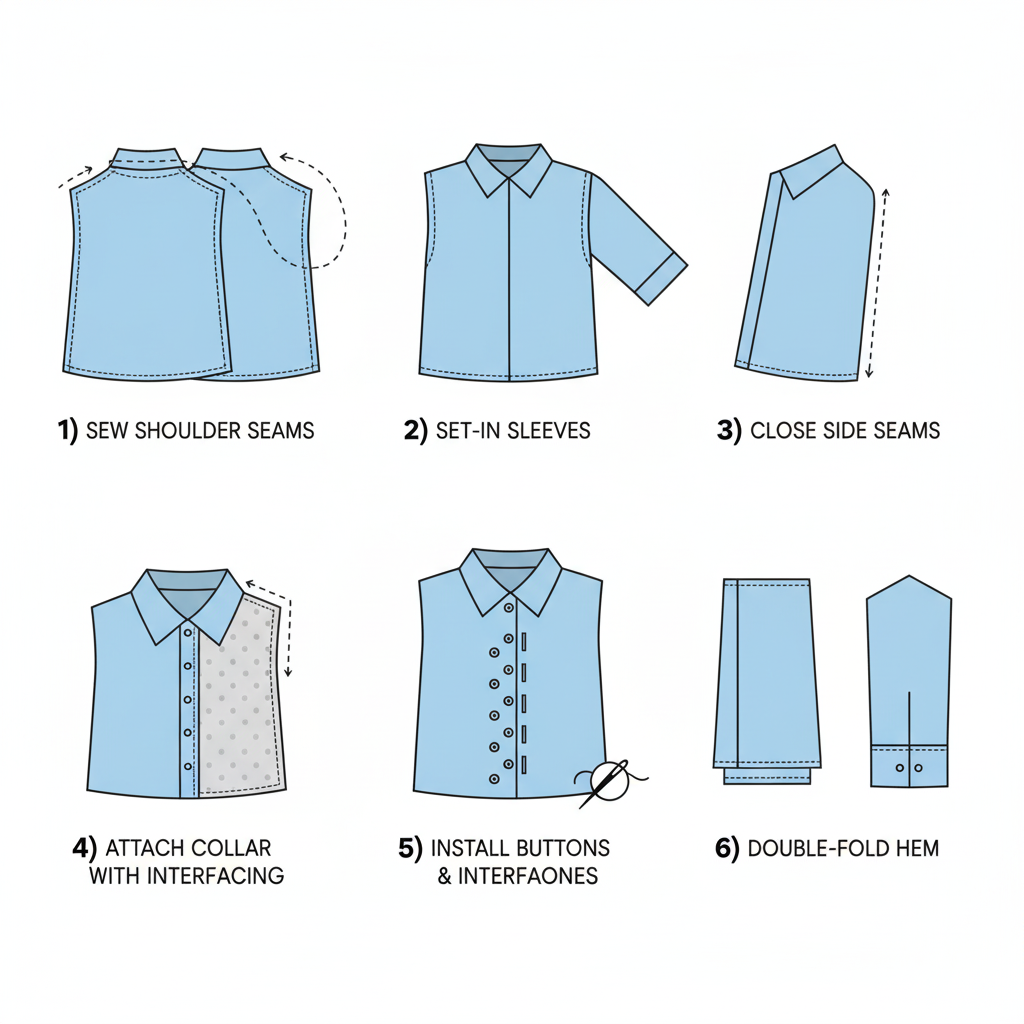
7) Example: Constructing a Shirt/Blouse
- Sew shoulder seams and press flat.
- Attach sleeves (set-in or raglan).
- Close side seams from sleeve cuff to hem.
- Attach collar or bias binding with interfacing, then topstitch.
- Install buttons or zipper; make buttonholes.
- Finish hem with double fold (2×1 cm) and pressing.
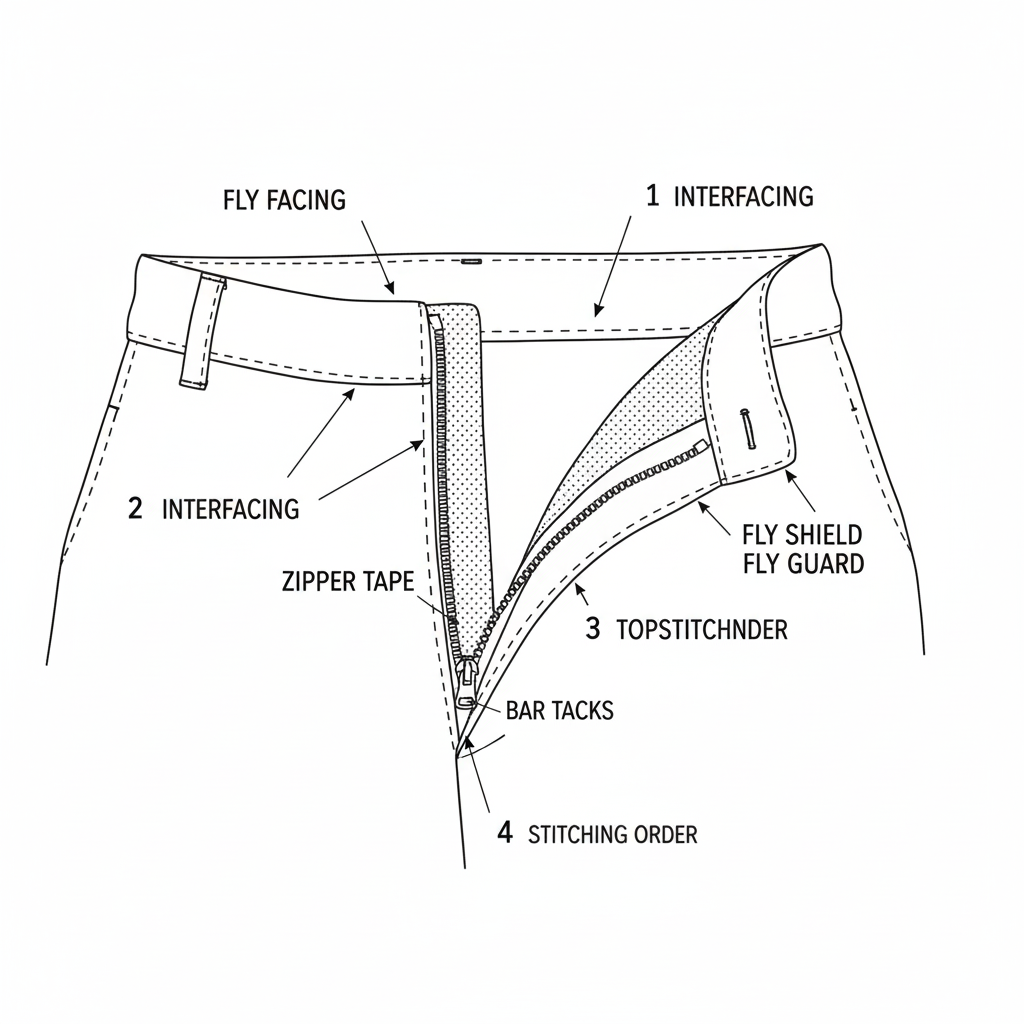
8) Example: Sewing Trousers
- Sew inseams for both legs separately.
- Join front and back rises, then attach legs together.
- Add pockets before closing side seams.
- Attach waistband with interfacing and belt loops.
- Install fly zipper neatly.
- Finish hem with 3–4 cm fold and press.
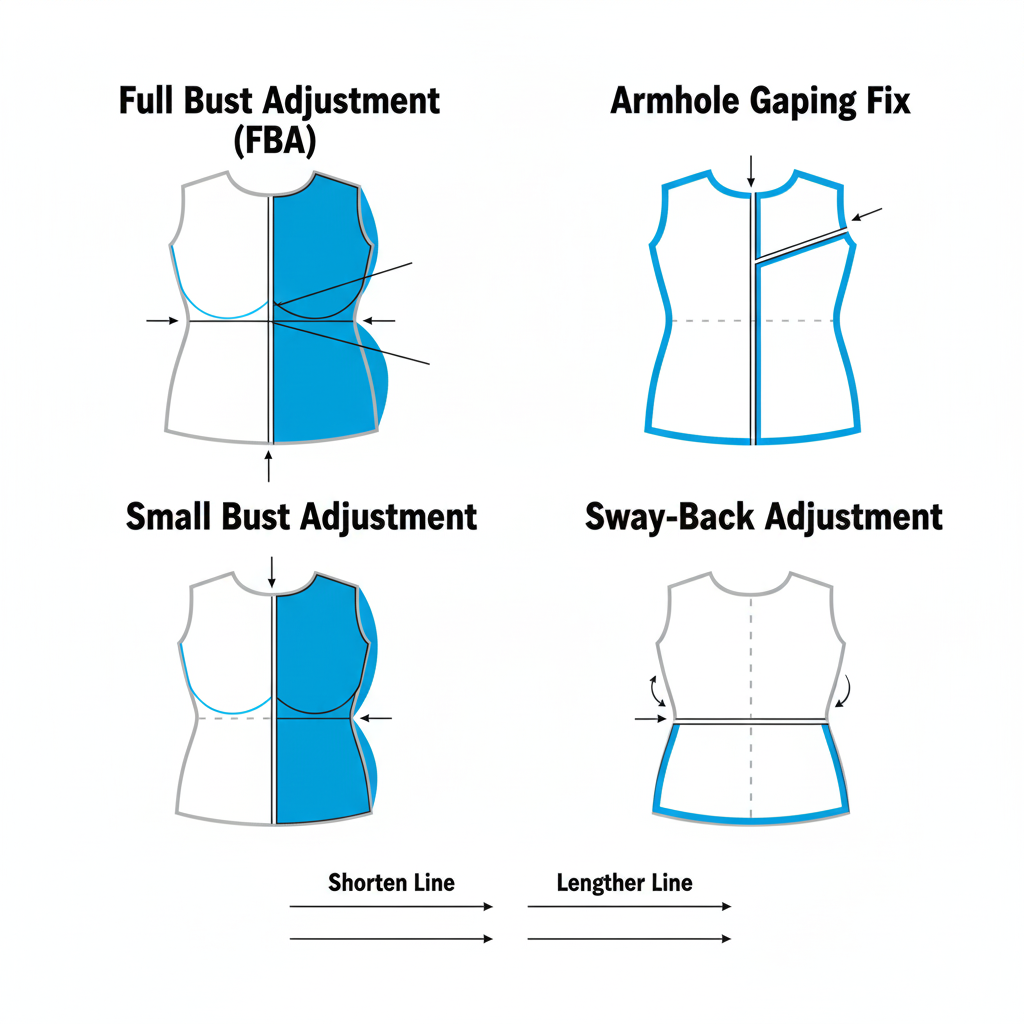
9) Fitting & Adjustments
- Tight bust/hips: Add ease or adjust darts.
- Armhole wrinkles: Reduce sleeve cap height or deepen armhole slightly.
- Shoulder slope mismatch: Modify shoulder angle and collar line.
- Length too short/long: Add or remove from waist or hem.
10) Finishing Touches
- Hems: Double-fold and press between steps.
- Zippers: Invisible or standard; use a zipper foot.
- Buttons & Buttonholes: Mark evenly, stitch buttonholes, then attach buttons.
- Final pressing: Match iron temperature to fabric type, use a press cloth.
- Care labels: Add washing/ironing instructions if applicable.
11) Quality Check & Checklist
- Symmetrical sleeves and hems; aligned collar; pattern matching across seams.
- Strong stitches at stress points (shoulders, underarms, zipper base).
- Clean seam finishes (overlock/zigzag), trimmed loose threads.
- Comfortable fit with full movement range.
12) FAQ & Glossary
How much ease is needed for a casual shirt?
Typically 4–8 cm around the bust for comfortable movement.
Why does fabric pucker while sewing?
Stitch length too short or thread tension too high. Adjust settings and test on a scrap.
Do I need a serger?
Optional — a zigzag stitch can also finish raw edges effectively.
Glossary
- Grainline: Direction of fabric threads ensuring proper drape.
- Ease: Extra space added for comfort and movement.
- Darts: Fabric folds shaping the garment to the body.
Start Now
Create a Custom Measurement Page Generate a QR Code for Care Guide
Disclaimer: Educational content only. Always adapt measurements to each body and test with fabric scraps before final construction.